이전에 Polymorphic한 React 컴포넌트 만들기라는 글을 통해 컴포넌트에 다형성을 적용하는 방법을 소개했었다. 해당 글에서는 as 속성을 이용하여 컴포넌트를 변형시키는 것을 소개하는 데 이를 이용하면 하나의 컴포넌트로 여러 요소(Element)나 그에 따른 속성(Attribute)을 이용할 수 있고 이를 넘어 다른 컴포넌트를 합성하는 것도 가능하다. 따라서 이를 이용하여 무엇이든지 될 수 있는 가장 추상화된 형태의 컴포넌트를 만들 수 있다.
다만 이 방법은 여러 비판을 받기도 하는데 가장 큰 이유는 모호성 때문이다. as 속성을 이용하여 컴포넌트를 결합하는 경우 전달할 수 있는 prop이 어떤 컴포넌트의 것인지 알기 힘들다는 점과 코드만 봐서는 어떻게 렌더링 되는지 알기 힘들다는 점이다. 그 외의 비판점으로는 자동 완성이 느려진다거나 TypeScript에서 타입을 추론하기 어렵다는 점 등이 있다.
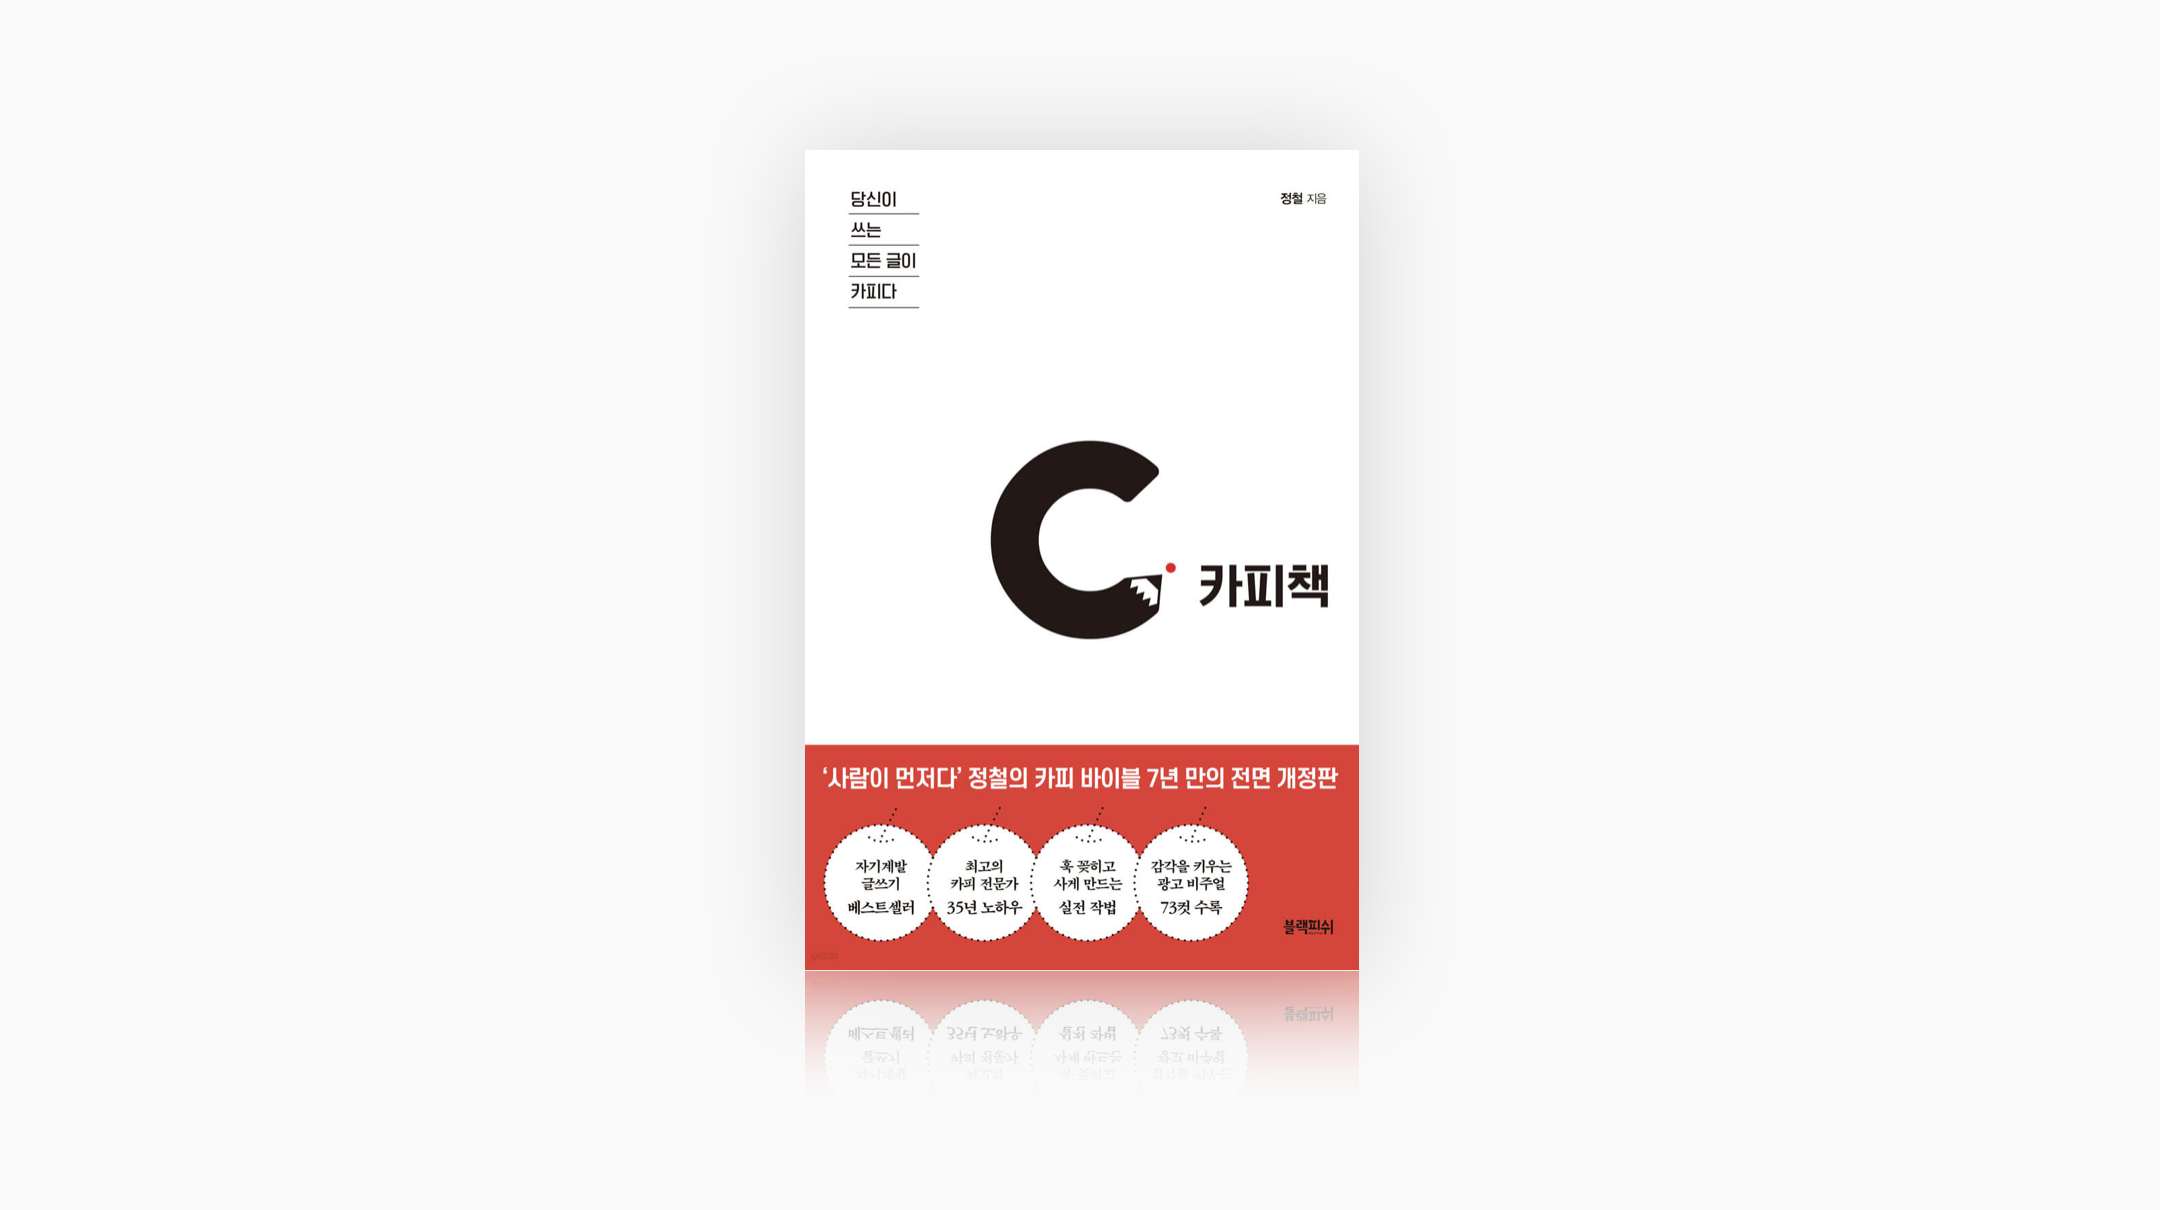
따라서 이에 대한 대안으로 자신의 속성과 행동을 자식 컴포넌트에 넘긴 후 자식이 직접 부모 컴포넌트를 대신하여 렌더링하는 방법인 Render Delegation1이 등장했다. 이는 Radix라는 오픈소스 리액트 컴포넌트 라이브러리를 통해 유명해진 방법으로 Render Delegation 기능을 제공하는 라이브러리는 보통 asChild라는 속성을 통해 해당 기능을 이용할 수 있게 제공한다.
Render Delegation 컴포넌트는 보통 Slot과 Slottable이라는 두 컴포넌트를 통해 구성된다. Slot은 자식 컴포넌트를 렌더링하는 역할을 하고 Slottable은 Slot에 들어갈 것이 무엇인지를 나타낸다.
참고로 Polymorphic 컴포넌트처럼 변형을 통한 다형성 문제 해결이라는 점은 같지만 Render Delegation 컴포넌트는 기존 컴포넌트와 합성이될 컴포넌트를 코드에서 분리한다는 점이 다르다.
문제 인식하기
만약 앞서 언급한 Polymorphic 컴포넌트와 이번 글에서 다룰 Render Delegation 컴포넌트가 왜 필요한지 잘 모를 수 있다. 이전에 작성한 글에서도 설명했지만 다시 한번 간단히 설명해 보겠다.
/**
 * Button.jsx
 */
export const Button = ({ ...props }) => {
  return (
    <button
      style={{ backgroundColor: 'black', color: 'white' }}
      {...props}
    />
  );
}

/**
 * App.jsx
 */
import { Button } from './Button';

const App = () => {
  return (
    <div>
      <Button onClick={() => alert('Good!')}>Click Me!</Button>
    </div>
  );
}
설명이 필요 없을 정도로 간단한 코드다. 단순하게 표현했지만 위 코드처럼 스타일만 적용한 컴포넌트는 실제로도 많이 사용된다. Button 컴포넌트는 prop으로 넘기는 값을 button 태그의 속성으로 전부 넘기기 때문에 꽤 확장성 있게 사용할 수 있는 컴포넌트라고 생각할 수 있다. 그런데 만약 버튼에 페이지 링크를 추가하고 싶다면 어떻게 해야 할까?
import { Button } from './Button';

const App = () => {
  return (
    <div>
      <a href="https://kciter.so">
        <Button>Click Me!</Button>
      </a>
    </div>
  );
}
위 코드처럼 작성할 수도 있겠지만 재사용성 측면에선 그다지 좋은 방법은 아니다. 추후 재사용을 고려하여 새로운 컴포넌트를 만들 수도 있다.
/**
 * Button.jsx
 */
export const Button = ({ ...props }) => {
  return (
    <button
      style={{ backgroundColor: 'black', color: 'white' }}
      {...props}
    />
  );
}

/**
 * LinkButton.jsx
 */
import { Button } from './Button';

export const LinkButton = ({ href, ...props }) => {
  return (
    <a href={href}>
      <Button {...props} />
    </a>
  );
}

/**
 * App.jsx
 */
import { LinkButton } from './LinkButton';

const App = () => {
  return (
    <div>
      <LinkButton href="https://kciter.so">Click Me!</LinkButton>
    </div>
  );
}
혹은 위와 같이 작성할 수도 있지만 이 경우 a 태그가 확장되지 않는다는 문제점이 있고 컴포넌트의 의존 관계가 새롭게 추가된다는 문제점이 있다. 그리고 만약 react-router나 Next.js를 사용하여 SPA를 위한 Link 컴포넌트를 사용한다면 또 새로운 컴포넌트를 만들어줄 수밖에 없다. 이 문제의 해결법으로 이전 글에서 다룬 Polymorphic 컴포넌트나 이번 글에서 다룰 Render Delegation 컴포넌트를 사용할 수 있다.
살펴보기
앞서 언급한 Radix에서는 asChild를 통해 Render Delegation이 가능한 컴포넌트를 제공한다. 해당 라이브러리를 통해 동작을 살펴보자.
엿보기
먼저 아주 간단한 예제를 살펴보자. 다음은 Radix에서 제공하는 Label을 사용하는 예제다.
import * as Label from "@radix-ui/react-label";

const App = () => {
  return (
    <div>
      {/* asChild를 사용하지 않은 경우 */}
      <Label.Root>
        https://kciter.so
      </Label.Root>
    </div>
  );
};
위 코드에서 사용하는 Label.Root 컴포넌트를 이용하면 특별한 기능 없이 label을 렌더링할 수 있다. 여기서 만약 링크를 추가하고 싶다면 다음과 같이 asChild 속성을 사용할 수 있다.
import * as Label from "@radix-ui/react-label";

const App = () => {
  return (
    <div>
      {/* asChild를 사용한 경우 */}
      <Label.Root asChild>
        <a href="https://kciter.so">https://kciter.so</a>
      </Label.Root>
    </div>
  );
};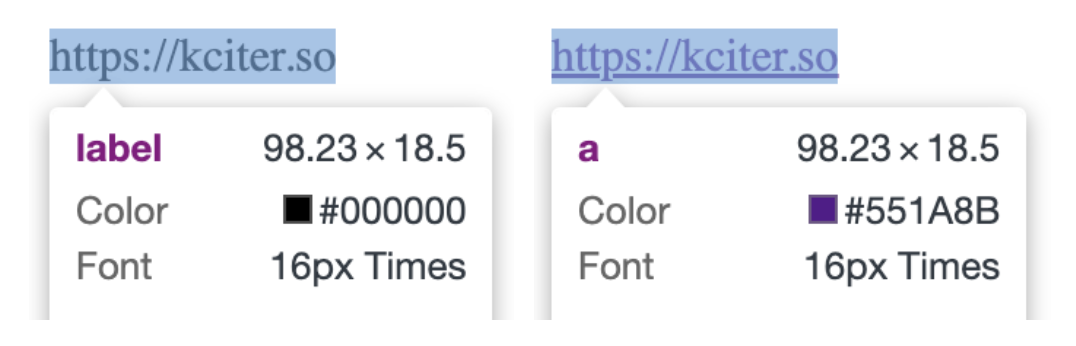
위와 같이 작성하면 렌더링 되는 요소가 a로 변경된다.
Slot 사용하기
앞서 살펴본 예제는 기본적으로 제공하는 컴포넌트에서 단순히 요소를 변경하기만 하는 아주 간단한 예제였다. Radix에서 제공하는 Slot을 이용하면 사용자가 직접 Render Delegation이 가능한 컴포넌트를 만들 수 있다.
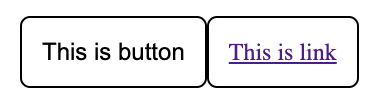
import { Slot } from "@radix-ui/react-slot";

const Button = ({ asChild, ...props }) => {
  const Element = asChild ? Slot : "button";
  return (
    <Element
      {...props}
      style={{
        padding: "10px",
        border: "1px solid #000",
        borderRadius: "5px",
        backgroundColor: 'transparent',
        fontSize: 12
      }}
    />
  );
};

const App = () => {
  return (
    <div>
      <Button>
        This is button
      </Button>

      <Button asChild>
        <a href="https://kciter.so">This is link</a>
      </Button>
    </div>
  );
};
Slot 컴포넌트는 children으로 받은 JSX 요소를 렌더링한다. 위 코드를 살펴보면 asChild 속성이 true일 때는 Slot 컴포넌트를 사용하고 false일 때는 button를 사용한다. 따라서 asChild를 사용한 컴포넌트의 렌더링 결과를 보면 기존 Button 컴포넌트에서 설정한 스타일은 변하지 않지만 요소가 변경된 것을 확인할 수 있다.
즉 Slot을 이용하여 부모 컴포넌트의 속성을 자식 컴포넌트에 넘기고 렌더링을 위임했다고 볼 수 있다.
Slottable 사용하기
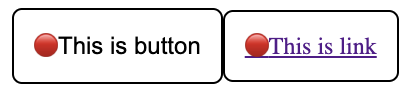
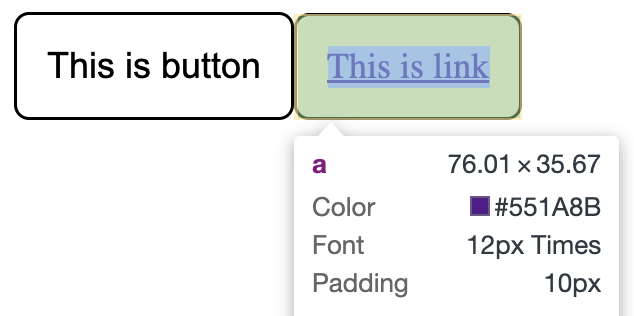
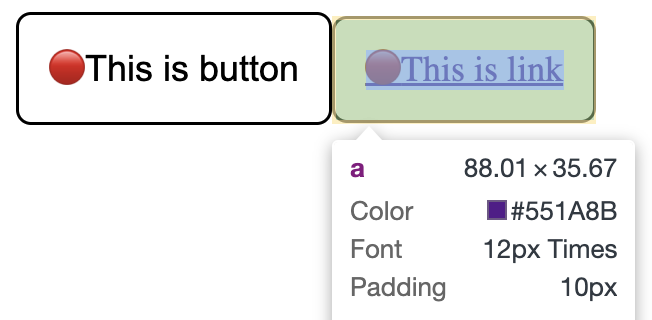
Slottable을 이용하면 일부분만 위임하는 것도 가능하다. 다음 예제를 살펴보자.
import { Slot, Slottable } from "@radix-ui/react-slot";

const Icon = () => (
  <span>🔴</span>
)

const Button = ({ asChild, icon, children, ...props }) => {
  const Element = asChild ? Slot : "button";
  return (
    <Element
      {...props}
      style={{
        padding: "10px",
        border: "1px solid #000",
        borderRadius: "5px",
        backgroundColor: 'transparent',
        fontSize: 12
      }}
    >
      {icon}
      <Slottable>{children}</Slottable>
    </Element>
  );
};

const App = () => {
  return (
    <div>
      <Button icon={<Icon />}>
        This is button
      </Button>

      <Button icon={<Icon />} asChild>
        <a href="https://kciter.so">This is link</a>
      </Button>
    </div>
  );
};
Slottable 컴포넌트는 Slot 컴포넌트로 렌더링 될 컴포넌트의 children이 들어갈 곳을 정할 수 있다. 즉, 위 코드에선 Button의 children이 아닌 a 요소의 children이 Slottable 컴포넌트 내부로 들어가게 된다.
실제로 렌더링 된 HTML을 보면 다음과 같다.
<div>
  <button style="...">
    <span>🔴</span>
    This is button
  </button>

  <a href="https://kciter.so" style="...">
    <span>🔴</span>
    This is link
  </a>
</div>
결과적으로 icon 속성은 Button 컴포넌트에서 설정한 대로 따르지만, 그 외 속성은 asChild 속성에 따라 위임된다. 즉, 위임하고 싶은 부분만 따로 지정해서 구현하는 것이 가능하다. 이렇게 Slottable을 사용하면 조금 더 풍부한 표현이 가능해진다. 참고로 Slot만 사용하는 것은 Slot 내부에 Slottable을 최상위로 둬서 사용하는 것과 같다.
구현하기
이제 Slot과 Slottable 컴포넌트가 어떻게 동작하는지 알았으니 이 두 컴포넌트를 직접 만들어보자. 여기서는 먼저 편의를 위해 JavaScript로 구현해 볼 것이다.
Slot 구현하기
Slot 컴포넌트는 children을 조금만 변형해서 렌더링하면 되기 때문에 아주 쉽게 구현할 수 있다. 다음 코드를 살펴보자.
/**
 * Slot.jsx
 */

import React from "react";

export const Slot = ({ children, ...props }) => {
  if (React.isValidElement(children)) {
    return React.cloneElement(children, {
      ...props,
      ...children.props,
    });
  }

  // 올바르지 않은 컴포넌트라면 경고 로그를 출력하고 null을 반환
  console.warn("Slot component should have only one React element as a child");

  return null;
};
위 코드에서 Slot 컴포넌트는 children으로 받은 JSX 요소를 렌더링한다. 만약 children이 JSX 요소라면 props를 합성하여 새로운 컴포넌트를 만들어 렌더링하고 그렇지 않다면 렌더링하지 않는다. 이때 children이 React Element가 아니거나 여러 개 들어오는 경우엔 경고 로그를 보여주고 null을 반환하도록 구현했다. 그럼 벌써 Slot을 구현했다. 이전에 Radix 예제에 사용했던 코드로 테스트하면 잘 돌아가는 것을 확인할 수 있다.
/**
 * App.jsx
 */

import { Slot } from "./Slot";

const Button = ({ asChild, ...props }) => {
  const Element = asChild ? Slot : "button";
  return (
    <Element {...props} style={/* ... */} />
  );
};

const App = () => {
  return (
    <div>
      <Button>
        This is button
      </Button>

      <Button asChild>
        <a href="https://kciter.so">This is link</a>
      </Button>
    </div>
  );
};
Slottable 구현하기
그럼 이번에는 Slottable 개념을 구현해보자.
/**
 * Slottable.jsx
 */

export const Slottable = ({ children }) => {
  return <>children</>;
}
사실 Slottable 컴포넌트는 따로 하는 게 없다. 그저 스스로 Slottable라는 것을 알려줄 수만 있으면 되기에 위와 같이 구현하면 된다. 대신 기존에 구현했던 Slot 컴포넌트의 로직을 변경할 필요가 있다. 이 부분이 조금 어려울 수 있다.
/**
 * Slot.jsx
 */

import React from "react";
import { Slottable } from "./Slottable";

export const Slot = ({ children, ...props }) => {
  const childrenArray = React.Children.toArray(children);
  const slottable = childrenArray.find((child) => {
    return React.isValidElement(child) && child.type === Slottable
  });

  if (slottable) { // Slottable이 있다면
    const newElement = slottable.props.children;
    const newChildren = childrenArray.map((child) => {
      // Slottable이 아닌 것은 그대로 반환
      if (child !== slottable) return child;

      // Slottable이라면 해당 영역을 자식 컴포넌트의 children으로 교체
      if (React.isValidElement(newElement)) {
        return newElement.props.children;
      } else {
        console.warn(
          "Slot component should have only one React element as a child"
        );
      }

      return null;
    });

    // 새로운 요소를 렌더링
    return React.isValidElement(newElement)
      ? React.cloneElement(
          newElement,
          { ...props, ...newElement.props },
          newChildren
        )
      : null
  }

  if (React.isValidElement(children)) {
    return React.cloneElement(children, {
      ...props,
      ...children.props,
    });
  }

  console.warn("Slot component should have only one React element as a child");

  return null;
};
기존 코드에서 달라진 점은 Slottable이 있는지 확인하고 있다면 이에 대해 처리해 주는 부분이다. 이 부분을 제외하면 기존 코드와 동일하다. 이렇게 만들어진 Slot과 Slottable을 이용하여 이전에 사용했던 예제로 실행해 보면 잘되는 것을 확인할 수 있다.
TypeScript 지원
이번에는 TypeScript으로 작성해 보자. 타입을 신경써야 해서 구현이 복잡하지 않을까 싶지만 Render Delegation 컴포넌트는 Polymorphic 컴포넌트와 다르게 변형할 컴포넌트가 코드에서 분리되기 때문에 타입 추론이 쉽다. 그래서 TypeScript로 구현하는 것은 JavaScript 구현과 크게 다르지 않다.
먼저 Slot 컴포넌트에 타입을 붙이면서 다시 구현해 보자.
/**
 * Slot.tsx
 */

import React from "react";

export interface SlotProps extends React.HTMLAttributes<HTMLElement> {
  children: React.ReactNode;
}

export type RenderDelegationProps<T> = T & {
  asChild?: boolean;
};

export const Slot = ({ children, ...props }: SlotProps) => {
  if (React.isValidElement(children)) {
    return React.cloneElement(children, {
      ...props,
      ...children.props,
    });
  }

  console.warn("Slot component should have only one React element as a child");

  return null;
};
타입을 상식적인 수준 정도로만 붙였는데 벌써 완성됐다. 코드 중 RenderDelegationProps는 Render Delegation을 사용할 컴포넌트에 붙일 수 있는 타입이다. 이 타입을 이용하면 asChild 속성을 사용할 수 있게 된다.
이어서 Slottable 개념과 관련된 로직에 타입을 붙이면서 다시 구현해 보자.
/**
 * Slottable.tsx
 */

import React from "react";

export interface SlottableProps {
  children: React.ReactNode;
}

export const Slottable = ({ children }: SlottableProps) => {
  return <>children</>;
};
마찬가지로 아주 간단하게 구현할 수 있다. 이제 Slot 컴포넌트의 로직을 변경하면서 타입을 붙이면 된다.
/**
 * Slot.tsx
 */

import React from "react";
import { Slottable, SlottableProps } from "./Slottable";

export interface SlotProps extends React.HTMLAttributes<HTMLElement> {
  children: React.ReactNode;
}

export type AsChildProps<T> = T & {
  asChild?: boolean;
};

export const Slot = ({ children, ...props }: SlotProps) => {
  const childrenArray = React.Children.toArray(children);
  const slottable = childrenArray.find((child) => {
    return React.isValidElement(child) && child.type === Slottable;
  }) as React.ReactElement<SlottableProps>;

  if (slottable) {
    const newElement = slottable.props.children;
    const newChildren = childrenArray.map((child) => {
      if (child !== slottable) return child;

      if (React.isValidElement(newElement)) {
        return newElement.props.children;
      } else {
        console.warn(
          "Slot component should have only one React element as a child"
        );
      }

      return null;
    });

    return React.isValidElement(newElement)
      ? React.cloneElement(
          newElement,
          { ...props, ...newElement.props },
          newChildren
        )
      : null;
  }

  if (React.isValidElement(children)) {
    return React.cloneElement(children, {
      ...props,
      ...children.props,
    });
  }

  console.warn("Slot component should have only one React element as a child");

  return null;
};
마찬가지로 기존 코드와 크게 다른 점이 없다. 딱 한 라인이 추가되었는데 이는 Slottable 컴포넌트를 찾은 후 어떤 타입인지 명시해 주는 것뿐이다. 만약 TypeScript의 사용자 정의 타입 가드 문법을 사용하면 다음과 같이 작성하는 것도 가능하다.
/**
 * Slot.tsx
 */

function isSlottable(child: React.ReactNode): child is React.ReactElement {
  return React.isValidElement(child) && child.type === Slottable;
}

export const Slot = ({ children, ...props }: SlotProps) => {
  const childrenArray = React.Children.toArray(children);
  const slottable = childrenArray.find(isSlottable);

  // ...
}
추가 구현
여기까지 구현했다면 아주 기초적인 Render Delegation 컴포넌트를 완성했다고 볼 수 있다. 다만, 몇 가지 특수한 상황을 해결하기 위해 추가적인 기능을 구현할 필요가 있다.
ref 받아오기
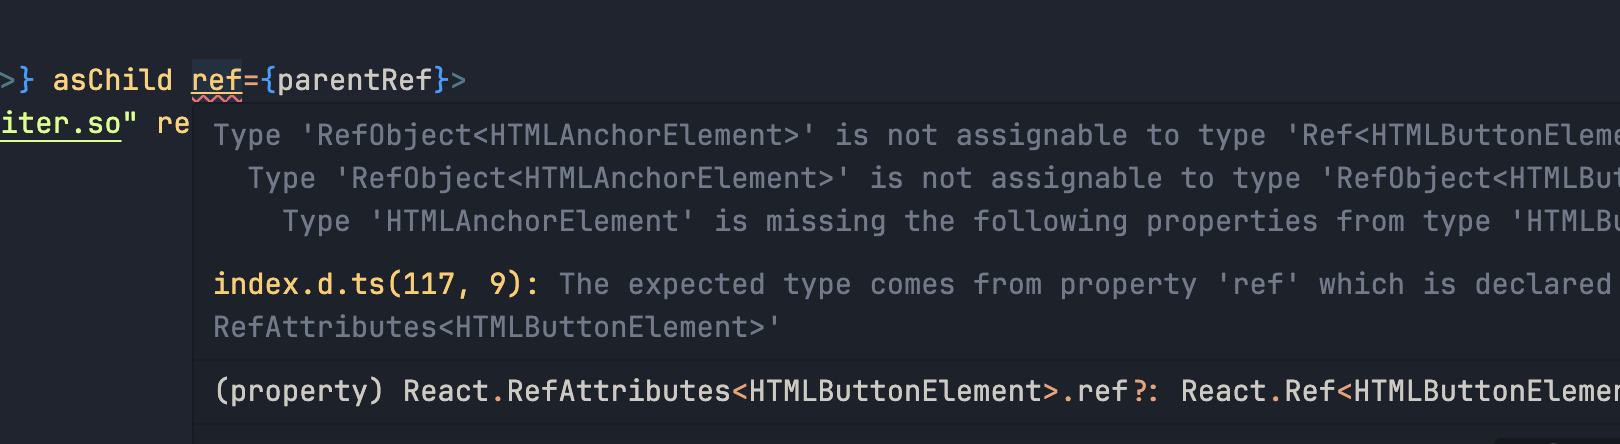
특수한 상황 중 하나는 ref를 사용하는 경우다. Polymorphic 컴포넌트와 다르게 Render Delegation 컴포넌트는 어디에 ref를 붙여야할지 애매할 수 있다.
<Button asChild ref={???}>
  <a href="https://kciter.so" ref={???}>
    Click me!
  </a>
</Button>ref를 넣어야할까?Radix에서는 어느 쪽에 붙이더라도 asChild를 사용한다면 같은 결과를 얻을 수 있다. 하지만 타입 추론 문제로 인해 asChild를 사용하는 경우 자식 컴포넌트에 ref를 붙이고 asChild를 사용하지 않으면 부모 컴포넌트에 ref를 사용하게 된다. 만약 타입 추론이 필요없다면 어느 쪽에 붙여도 상관 없다.
아래 코드는 Radix에서 제공하는 코드를 참고한 것이다. 한 번 살펴보자.
type PossibleRef<T> = React.Ref<T> | undefined;

// ref를 설정하는 함수
function setRef<T>(ref: PossibleRef<T>, value: T) {
  if (typeof ref === "function") {
    ref(value);
  } else if (ref !== null && ref !== undefined) {
    (ref as React.MutableRefObject<T>).current = value;
  }
}

// ref를 합성하는 함수
function composeRefs<T>(...refs: PossibleRef<T>[]) {
  return (node: T) => refs.forEach((ref) => setRef(ref, node));
}
위 코드를 보면 ref를 설정하는 setRef 함수와 여러 ref를 합성하여 하나의 ref를 만드는 composeRefs 함수가 있다. 이제 이를 이용하여 Slot 컴포넌트에 ref를 설정할 수 있도록 구현해보자.
/**
 * Slot.tsx
 */

// forwardRef로 감싸서 ref를 받아올 수 있도록 만든다.
export const Slot = React.forwardRef<any, SlotProps>((props, ref) => {
  const { children, ...slotProps } = props;
  const childrenArray = React.Children.toArray(children);
  const slottable = childrenArray.find(isSlottable);

  if (slottable) {
    // ...

    return React.isValidElement(newElement)
      ? React.cloneElement(
          newElement,
          {
            ...slotProps,
            ...newElement.props,
            // forwardRef로 받아온 ref가 있고 자식 컴포넌트에 ref가 있다면 합성한다.
            // forwardRef로 받아온 ref가 없다면 자식 컴포넌트의 ref를 넣어준다.
            ref: ref ? composeRefs(ref, (newElement as any).ref) : (newElement as any).ref,
          },
          newChildren
        )
      : null;
  }

  if (React.isValidElement(children)) {
    return React.cloneElement(children, {
      ...props,
      ...children.props,
      // 이곳에도 마찬가지로 ref를 설정한다.
      ref: ref ? composeRefs(ref, (newElement as any).ref) : (newElement as any).ref,
    });
  }

  console.warn("Slot component should have only one React element as a child");

  return null;
});
위와 같이 코드를 작성했다면 Button 컴포넌트도 ref를 받을 수 있게 수정해보자.
/**
 * Button.tsx
 */

import React from "react";
import { AsChildProps, Slot } from "./Slot";
import { Slottable } from "./Slottable";

interface Props {
  children: React.ReactNode;
  icon?: React.ReactNode;
  onClick?: () => void;
}

export type ButtonProps = AsChildProps<Props>;

                      /* 우선 ref 타입을 any로 설정했다 */
export const Button = React.forwardRef<any, ButtonProps>((props, ref) => {
  const { asChild, children, icon } = props;
  const Element = asChild ? Slot : "button";
  return (
    <Element
      ref={ref}
      style={{
        padding: "10px",
        border: "1px solid #000",
        borderRadius: "5px",
        backgroundColor: "transparent",
        fontSize: 12,
      }}
    >
      {icon}
      <Slottable>{children}</Slottable>
    </Element>
  );
});
이어서 잘 돌아가는지 확인해보자.
/**
 * App.tsx
 */

import { useEffect, useRef } from "react";
import { Button } from "./components/Button";

const Icon = () => <span>🔴</span>;

const App = () => {
  const buttonRef = useRef<HTMLButtonElement>(null);
  const parentRef = useRef<HTMLAnchorElement>(null);
  const childRef = useRef<HTMLAnchorElement>(null);

  useEffect(() => {
    console.log(buttonRef.current, parentRef.current, childRef.current);
    console.log(buttonRef.current === parentRef.current, parentRef.current === childRef.current);
  }, []);

  return (
    <div>
      <Button icon={<Icon />} ref={buttonRef}>
        This is button
      </Button>

      <Button icon={<Icon />} asChild ref={parentRef}>
        <a href="https://kciter.so" ref={childRef}>
          This is link
        </a>
      </Button>
    </div>
  );
};

export default App;
로그를 확인해보면 다음과 같이 잘 동작하는 것을 확인할 수 있다.

만약 Button 컴포넌트에 ref 타입을 명시해준다면 부모 컴포넌트에 자식 컴포넌트 ref 타입인 HTMLAnchorElement을 사용할 수 없다.
/**
 * Button.tsx
 */

type ButtonElement = React.ElementRef<'button'>;
export const Button = React.forwardRef<ButtonElement, ButtonProps>((props, ref) => {
  // ...
});
prop 병합 문제
또 다른 특수한 상황은 부모 컴포넌트와 자식 컴포넌트의 prop 명칭이 같은 경우다.
<Button type="primary" asChild>
  <Anchor type="underline" href="https://kciter.so">
    Click me!
  </Anchor>
</Button>
지금까지 작성한 코드로는 무조건 자식 컴포넌트가 부모 컴포넌트의 prop을 덮어쓰게 된다. 예를 들어 다음과 같은 코드를 작성했다고 가정해보자.
<Button icon={<Icon />} onClick={() => alert("Hi!")} asChild>
  <a onClick={() => alert("Hello!")} ref={childRef}>
    Show alert
  </a>
</Button>
만약 위 코드에서 주입된 두 onClick이 같이 실행되길 원한다면 지금까지 구현한 코드로는 불가능하다. 이처럼 어떤 prop은 특별한 규칙을 가져야 할 수도 있다. 이런 경우를 위해 Slot 컴포넌트에 prop을 병합하는 함수을 추가해보자. 다음 코드 또한 Radix에서 사용되는 코드다. 이해를 위해 필자가 몇 가지 주석을 추가했다. 한 번 살펴보자.
type AnyProps = Record<string, any>;

function mergeProps(slotProps: AnyProps, childProps: AnyProps) {
  // 우선 Child prop을 넣어준다
  const overrideProps = { ...childProps };

  // Child prop을 순회하면서
  for (const propName in childProps) {
    const slotPropValue = slotProps[propName];
    const childPropValue = childProps[propName];

    const isHandler = /^on[A-Z]/.test(propName);

    // on으로 시작되는 이벤트 핸들러일 때
    if (isHandler) {
      // 둘 다 존재하는 경우 두 핸들러가 같이 실행될 수 있도록 합쳐준다
      if (slotPropValue && childPropValue) {
        overrideProps[propName] = (...args: unknown[]) => {
          childPropValue(...args);
          slotPropValue(...args);
        };
      }
      // 만약 Slot에만 존재하면 그것만 사용한다
      else if (slotPropValue) {
        overrideProps[propName] = slotPropValue;
      }
    }
    // style prop인 경우 Slot과 Child의 style을 합쳐준다
    else if (propName === 'style') {
      overrideProps[propName] = { ...slotPropValue, ...childPropValue };
    }
    // className prop도 마찬가지로 합쳐준다
    else if (propName === 'className') {
      overrideProps[propName] = [slotPropValue, childPropValue].filter(Boolean).join(' ');
    }
  }

  // slotProps과 앞서 만들어준 overrideProps를 합쳐준다
  // Spread 연산자를 사용했기에 같은 이름이라면 overrideProps가 덮어쓴다
  return { ...slotProps, ...overrideProps };
}
위 함수를 이용해 Slot 컴포넌트를 수정해보자.
/**
 * Slot.tsx
 */

export const Slot = React.forwardRef<any, SlotProps>((props, ref) => {
  // ...

  if (slottable) {
    // ...
    return React.isValidElement(newElement)
      ? React.cloneElement(
          newElement,
          {
            // Slot의 prop과 자식 컴포넌트의 prop을 병합한다
            ...mergeProps(slotProps, newElement.props) as any,
            ref: ref ? composeRefs(ref, (newElement as any).ref) : (newElement as any).ref,
          },
          newChildren
        )
      : null;
  }

  if (React.isValidElement(children)) {
    return React.cloneElement(children, {
      // 여기도 추가해준다
      ...mergeProps(slotProps, children.props) as any,
      ref: ref ? composeRefs(ref, (children as any).ref) : (children as any).ref,
    });
  }

  // ...

  return null;
});
그리고 다음과 같은 코드로 테스트해보자.
/**
 * App.tsx
 */

import { Button } from "./components/Button";

const App = () => {
  // ...

  return (
    <div>
      {/* ... */}
      <Button icon={<Icon />} onClick={() => alert("Hi!")} asChild>
        <a onClick={() => alert("Hello!")} ref={childRef}>
          Show alert
        </a>
      </Button>
    </div>
  );
};

export default App;
위 코드를 작성한 후 버튼을 클릭하면 두 번의 알림이 뜨는 것을 확인할 수 있다. 다만, 이러한 병합 규칙은 코드를 보는게 아니라면 알 수 없다. 따라서 이런 경우에는 만들어 둔 병합 함수의 규칙을 확실히 전파할 필요가 있다.
Polymorphic vs Render Delegation
이전에 다룬 Polymorphic과 Render Delegation 중 어떤 것을 사용해야 할지 고민이 될 수 있다. 둘 다 해결하려는 목적은 비슷한지만 사용하는 방법이 다르고 각각 장단점이 있다.
가독성 측면에서 Render Delegation은 두 컴포넌트를 확실하게 분리하기 때문에 어디에 어떤 prop이 사용되는지 확실하게 알 수 있다. 반면 Polymorphic은 컴포넌트를 하나로 통합하기 때문에 어떤 컴포넌트의 prop인지 알기 어려운 경우가 있다. 그렇지만 컴포넌트 구성이 복잡하지 않고 완전 대체가 가능한 경우에는 Polymorphic이 더 간단하게 사용할 수 있다. 예를 들어, Header라는 컴포넌트가 있고 as를 사용하여 h1로 변경하거나 h2로 변경하는 경우에는 Polymorphic이 더 직관적일 수 있다.
그래서 필자가 생각하기에 Polymorphic은 컴포넌트 전체를 감싸는 것을 변경하는 경우에 적합하다. 예를 들어 버튼 컴포넌트에서 button으로 사용되는 DOM을 a로 변경하거나 input[type=submit]으로 변경하는 것이다. 반면 Render Delegation은 컴포넌트의 일부분을 위임하는 것에 적합하다.
이 외에도 몇 가지 논의할 주제가 있다. 타입 추론에 대한 성능이나 코드의 복잡도, 렌더링 속도 등이다. Polymorphic 컴포넌트는 타입 구성이 복잡하기에 투입 추론에 대한 성능이 느리다. 반면 Render Delegation은 그에 비해 간단하기 때문에 타입 추론이 빠르다. 이는 자동 완성 성능에도 영향이 있으므로 생산성에 영향을 미칠 수 있는 문제다. 이런 문제에 더 관심이 있다면 다음 링크도 한 번 살펴보면 좋다.
- https://github.com/ariakit/ariakit/issues/1245
- https://sandroroth.com/blog/react-polymorphic-components/
- https://www.bekk.christmas/post/2023/01/polymorphism-in-react
마치며
이전에 포스팅한 as를 이용한 Polymorphic 컴포넌트와 asChild를 이용하는 Slottable 컴포넌트는 각각 장단점이 있다. 따라서 무엇이 더 좋다면서 추종하는 것보단 다양한 패턴이 있음을 인지하고 상황에 따라 적절한 방법을 선택하여 사용하는 것이 중요하다. 참고로 이 포스팅을 통해 만들어진 최종적인 코드는 GitHub 저장소에서 확인할 수 있다.
Footnotes
-
렌더링을 다른 컴포넌트에 맡기기 때문에 Render Delegation이라 부른다. ↩