
In an earlier post, Building a Polymorphic React Component, I introduced a way to apply polymorphism to components. That post used the as prop to transform a component. With it, a single component can use several elements and their attributes, and beyond that it can compose with other components. So it lets you build the most abstracted form of a component, which can become anything.
But this approach also gets a lot of criticism, and the biggest reason is ambiguity. When components are combined through the as prop, it’s hard to tell which component a given prop belongs to, and hard to tell from the code alone how it will render. Other complaints are that autocompletion gets slower and that TypeScript has a hard time inferring the types.
As an alternative, Render Delegation1 appeared. The parent hands its props and behavior to a child component, and the child renders in place of the parent. The approach became well known through Radix, an open source React component library, and libraries that offer Render Delegation usually expose it through a prop called asChild.
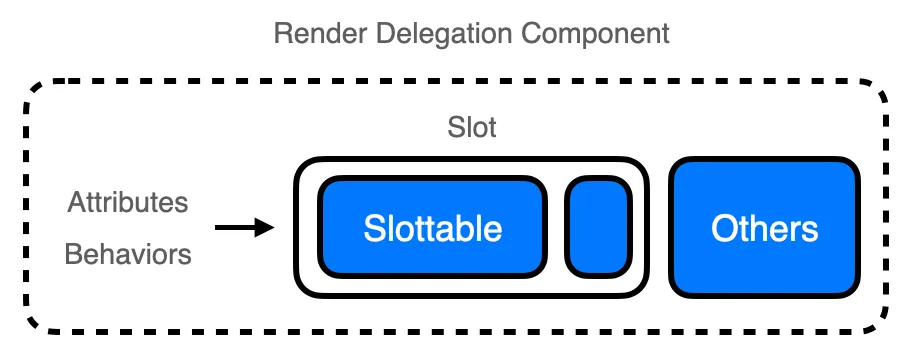
A Render Delegation component is usually made of two components, Slot and Slottable. Slot is responsible for rendering the child component, and Slottable marks what goes into the Slot.
Like the Polymorphic component, it solves the polymorphism problem through transformation, but a Render Delegation component differs in that it separates the existing component from the component it will be composed with, in the code.
Recognizing the Problem
You may not be sure why the Polymorphic component mentioned above, or the Render Delegation component covered in this post, is needed. I explained this in the previous post, but let me go over it again briefly.
/**
 * Button.jsx
 */
export const Button = ({ ...props }) => {
  return (
    <button
      style={{ backgroundColor: 'black', color: 'white' }}
      {...props}
    />
  );
}

/**
 * App.jsx
 */
import { Button } from './Button';

const App = () => {
  return (
    <div>
      <Button onClick={() => alert('Good!')}>Click Me!</Button>
    </div>
  );
}
The code needs no explanation. It’s minimal, but components that only apply a style, like the one above, are used a lot in practice. Since the Button component passes every prop it receives on to the button tag as attributes, you could think of it as an extensible component. But what if you want to add a page link to the button?
import { Button } from './Button';

const App = () => {
  return (
    <div>
      <a href="https://kciter.so">
        <Button>Click Me!</Button>
      </a>
    </div>
  );
}
You could write it like this, but in terms of reusability it isn’t a very good approach. You could also make a new component with future reuse in mind.
/**
 * Button.jsx
 */
export const Button = ({ ...props }) => {
  return (
    <button
      style={{ backgroundColor: 'black', color: 'white' }}
      {...props}
    />
  );
}

/**
 * LinkButton.jsx
 */
import { Button } from './Button';

export const LinkButton = ({ href, ...props }) => {
  return (
    <a href={href}>
      <Button {...props} />
    </a>
  );
}

/**
 * App.jsx
 */
import { LinkButton } from './LinkButton';

const App = () => {
  return (
    <div>
      <LinkButton href="https://kciter.so">Click Me!</LinkButton>
    </div>
  );
}
Or you could write it like this, but now the a tag can’t be extended, and a new dependency between components has been added. And if you use a Link component for an SPA, from react-router or Next.js, you end up having to make yet another component. To solve this, you can use the Polymorphic component from the previous post or the Render Delegation component covered here.
Taking a Look
Radix, mentioned above, provides components that support Render Delegation through asChild. Let’s look at how it behaves through that library.
A Peek
First, a very simple example. The following uses the Label provided by Radix.
import * as Label from "@radix-ui/react-label";

const App = () => {
  return (
    <div>
      {/* without asChild */}
      <Label.Root>
        https://kciter.so
      </Label.Root>
    </div>
  );
};
The Label.Root component in this code renders a label with no special behavior. If you want to add a link here, you can use the asChild prop like this.
import * as Label from "@radix-ui/react-label";

const App = () => {
  return (
    <div>
      {/* with asChild */}
      <Label.Root asChild>
        <a href="https://kciter.so">https://kciter.so</a>
      </Label.Root>
    </div>
  );
};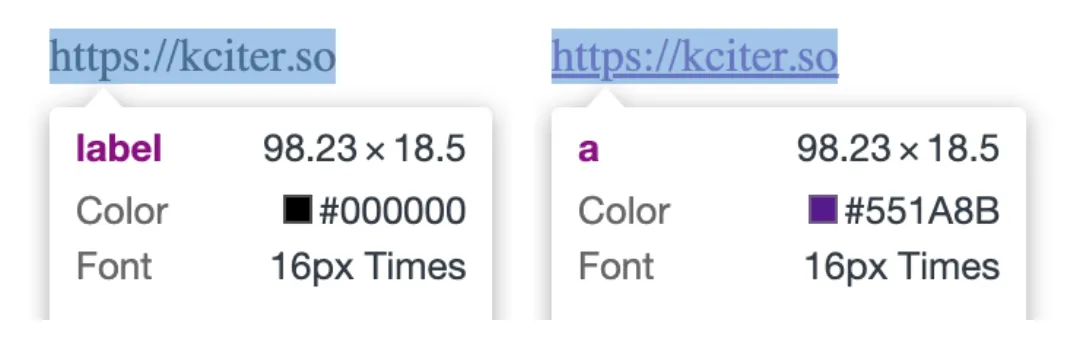
If you write it like this, the rendered element changes to a.
Using Slot
The example above was a very simple one that only swapped the element in a component the library already provides. With the Slot that Radix provides, you can build your own component that supports Render Delegation.
import { Slot } from "@radix-ui/react-slot";

const Button = ({ asChild, ...props }) => {
  const Element = asChild ? Slot : "button";
  return (
    <Element
      {...props}
      style={{
        padding: "10px",
        border: "1px solid #000",
        borderRadius: "5px",
        backgroundColor: 'transparent',
        fontSize: 12
      }}
    />
  );
};

const App = () => {
  return (
    <div>
      <Button>
        This is button
      </Button>

      <Button asChild>
        <a href="https://kciter.so">This is link</a>
      </Button>
    </div>
  );
};
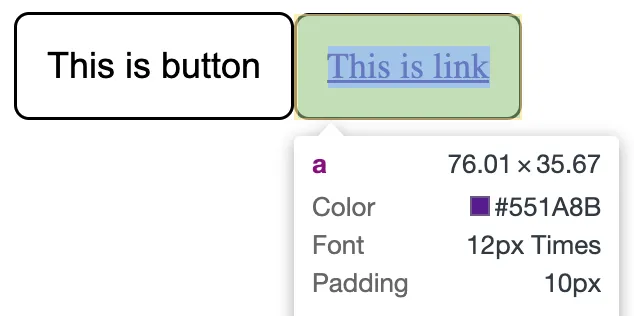
The Slot component renders the JSX element it receives as children. In the code above, when the asChild prop is true the Slot component is used, and when it’s false, button is used. So if you look at the rendering result of the component that uses asChild, the style set in the original Button component is unchanged, but the element has changed.
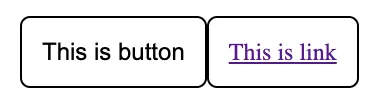
So you could say that Slot passes the parent component’s props to the child component and delegates the rendering to it.
Using Slottable
With Slottable, you can also delegate only part of the component. Look at the following example.
import { Slot, Slottable } from "@radix-ui/react-slot";

const Icon = () => (
  <span>🔴</span>
)

const Button = ({ asChild, icon, children, ...props }) => {
  const Element = asChild ? Slot : "button";
  return (
    <Element
      {...props}
      style={{
        padding: "10px",
        border: "1px solid #000",
        borderRadius: "5px",
        backgroundColor: 'transparent',
        fontSize: 12
      }}
    >
      {icon}
      <Slottable>{children}</Slottable>
    </Element>
  );
};

const App = () => {
  return (
    <div>
      <Button icon={<Icon />}>
        This is button
      </Button>

      <Button icon={<Icon />} asChild>
        <a href="https://kciter.so">This is link</a>
      </Button>
    </div>
  );
};
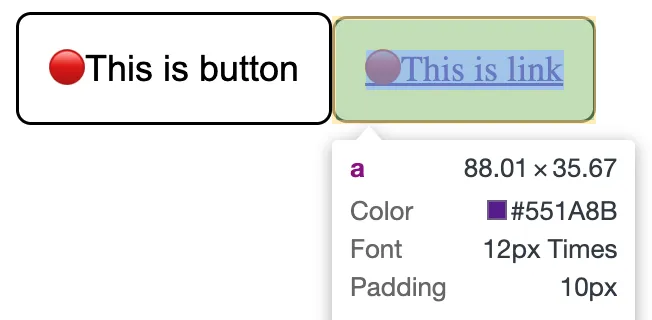
The Slottable component decides where the children of the component rendered by Slot will go. In the code above, it’s the children of the a element, not the children of Button, that go inside the Slottable component.
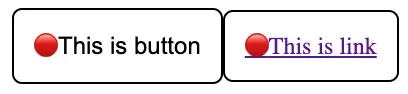
The rendered HTML looks like this.
<div>
  <button style="...">
    <span>🔴</span>
    This is button
  </button>

  <a href="https://kciter.so" style="...">
    <span>🔴</span>
    This is link
  </a>
</div>
As a result, the icon prop follows what the Button component set, while the other props are delegated according to the asChild prop. That is, you can specify only the part you want to delegate and implement it that way. Using Slottable like this allows richer expression. Using Slot alone is the same as placing a Slottable at the top level inside the Slot.
Implementing It
Now that we know how the Slot and Slottable components behave, let’s build them ourselves. For convenience, we’ll implement them in JavaScript first.
Implementing Slot
The Slot component only needs to render children with a small transformation, so it’s very easy to implement. Look at the following code.
/**
 * Slot.jsx
 */

import React from "react";

export const Slot = ({ children, ...props }) => {
  if (React.isValidElement(children)) {
    return React.cloneElement(children, {
      ...props,
      ...children.props,
    });
  }

  // if it isn't a valid component, print a warning and return null
  console.warn("Slot component should have only one React element as a child");

  return null;
};
In this code, the Slot component renders the JSX element it receives as children. If children is a JSX element, it merges the props to create a new component and renders it. If not, it renders nothing. When children is not a React element, or when several come in, it prints a warning and returns null. So Slot is already implemented. Testing it with the code from the Radix example earlier shows that it works fine.
/**
 * App.jsx
 */

import { Slot } from "./Slot";

const Button = ({ asChild, ...props }) => {
  const Element = asChild ? Slot : "button";
  return (
    <Element {...props} style={/* ... */} />
  );
};

const App = () => {
  return (
    <div>
      <Button>
        This is button
      </Button>

      <Button asChild>
        <a href="https://kciter.so">This is link</a>
      </Button>
    </div>
  );
};
Implementing Slottable
Now let’s implement the Slottable concept.
/**
 * Slottable.jsx
 */

export const Slottable = ({ children }) => {
  return <>children</>;
}
The Slottable component doesn’t actually do anything on its own. It only needs to be able to announce that it is a Slottable, so the implementation above is enough. Instead, the logic of the Slot component we implemented earlier needs to change. This part can be a little tricky.
/**
 * Slot.jsx
 */

import React from "react";
import { Slottable } from "./Slottable";

export const Slot = ({ children, ...props }) => {
  const childrenArray = React.Children.toArray(children);
  const slottable = childrenArray.find((child) => {
    return React.isValidElement(child) && child.type === Slottable
  });

  if (slottable) { // if there is a Slottable
    const newElement = slottable.props.children;
    const newChildren = childrenArray.map((child) => {
      // anything that isn't the Slottable is returned as is
      if (child !== slottable) return child;

      // if it is the Slottable, replace that spot with the child component's children
      if (React.isValidElement(newElement)) {
        return newElement.props.children;
      } else {
        console.warn(
          "Slot component should have only one React element as a child"
        );
      }

      return null;
    });

    // render the new element
    return React.isValidElement(newElement)
      ? React.cloneElement(
          newElement,
          { ...props, ...newElement.props },
          newChildren
        )
      : null
  }

  if (React.isValidElement(children)) {
    return React.cloneElement(children, {
      ...props,
      ...children.props,
    });
  }

  console.warn("Slot component should have only one React element as a child");

  return null;
};
What changed from the earlier code is the part that checks for a Slottable and handles it if there is one. Other than that, the code is the same as before. Running the earlier example with this Slot and Slottable shows that it works.
TypeScript Support
This time, let’s write it in TypeScript. You might expect the implementation to get complicated because of the types, but unlike the Polymorphic component, the Render Delegation component keeps the component to be transformed separate in the code, so type inference is easy. For that reason, the TypeScript implementation isn’t much different from the JavaScript one.
First, let’s reimplement the Slot component with types attached.
/**
 * Slot.tsx
 */

import React from "react";

export interface SlotProps extends React.HTMLAttributes<HTMLElement> {
  children: React.ReactNode;
}

export type RenderDelegationProps<T> = T & {
  asChild?: boolean;
};

export const Slot = ({ children, ...props }: SlotProps) => {
  if (React.isValidElement(children)) {
    return React.cloneElement(children, {
      ...props,
      ...children.props,
    });
  }

  console.warn("Slot component should have only one React element as a child");

  return null;
};
The types are only attached at a common-sense level, and it’s already done. In this code, RenderDelegationProps is a type that can be attached to a component that will use Render Delegation. With this type, the component can use the asChild prop.
Next, let’s reimplement the logic around the Slottable concept with types attached.
/**
 * Slottable.tsx
 */

import React from "react";

export interface SlottableProps {
  children: React.ReactNode;
}

export const Slottable = ({ children }: SlottableProps) => {
  return <>children</>;
};
This is just as simple to implement. Now we change the logic of the Slot component and attach types.
/**
 * Slot.tsx
 */

import React from "react";
import { Slottable, SlottableProps } from "./Slottable";

export interface SlotProps extends React.HTMLAttributes<HTMLElement> {
  children: React.ReactNode;
}

export type AsChildProps<T> = T & {
  asChild?: boolean;
};

export const Slot = ({ children, ...props }: SlotProps) => {
  const childrenArray = React.Children.toArray(children);
  const slottable = childrenArray.find((child) => {
    return React.isValidElement(child) && child.type === Slottable;
  }) as React.ReactElement<SlottableProps>;

  if (slottable) {
    const newElement = slottable.props.children;
    const newChildren = childrenArray.map((child) => {
      if (child !== slottable) return child;

      if (React.isValidElement(newElement)) {
        return newElement.props.children;
      } else {
        console.warn(
          "Slot component should have only one React element as a child"
        );
      }

      return null;
    });

    return React.isValidElement(newElement)
      ? React.cloneElement(
          newElement,
          { ...props, ...newElement.props },
          newChildren
        )
      : null;
  }

  if (React.isValidElement(children)) {
    return React.cloneElement(children, {
      ...props,
      ...children.props,
    });
  }

  console.warn("Slot component should have only one React element as a child");

  return null;
};
Again, not much is different from the earlier code. Exactly one line was added, and it only specifies the type after finding the Slottable component. If you use TypeScript’s user-defined type guards, you can also write it like this.
/**
 * Slot.tsx
 */

function isSlottable(child: React.ReactNode): child is React.ReactElement {
  return React.isValidElement(child) && child.type === Slottable;
}

export const Slot = ({ children, ...props }: SlotProps) => {
  const childrenArray = React.Children.toArray(children);
  const slottable = childrenArray.find(isSlottable);

  // ...
}
Further Implementation
If you’ve implemented this much, you have a very basic Render Delegation component. But to handle a few special situations, some additional features need to be implemented.
Receiving a ref
One of those special situations is using a ref. Unlike the Polymorphic component, with a Render Delegation component it can be unclear where the ref should be attached.
<Button asChild ref={???}>
  <a href="https://kciter.so" ref={???}>
    Click me!
  </a>
</Button>ref go?In Radix, with asChild you get the same result whichever side you attach it to. But because of type inference, when asChild is used the ref goes on the child component, and when asChild is not used the ref goes on the parent component. If you don’t need type inference, either side is fine.
The code below is based on the code Radix provides. Let’s take a look.
type PossibleRef<T> = React.Ref<T> | undefined;

// sets a ref
function setRef<T>(ref: PossibleRef<T>, value: T) {
  if (typeof ref === "function") {
    ref(value);
  } else if (ref !== null && ref !== undefined) {
    (ref as React.MutableRefObject<T>).current = value;
  }
}

// composes refs
function composeRefs<T>(...refs: PossibleRef<T>[]) {
  return (node: T) => refs.forEach((ref) => setRef(ref, node));
}
The code has a setRef function that sets a ref, and a composeRefs function that composes several refs into one. Now let’s use these to let the Slot component set a ref.
/**
 * Slot.tsx
 */

// wrap it in forwardRef so it can receive a ref
export const Slot = React.forwardRef<any, SlotProps>((props, ref) => {
  const { children, ...slotProps } = props;
  const childrenArray = React.Children.toArray(children);
  const slottable = childrenArray.find(isSlottable);

  if (slottable) {
    // ...

    return React.isValidElement(newElement)
      ? React.cloneElement(
          newElement,
          {
            ...slotProps,
            ...newElement.props,
            // if there is a ref from forwardRef and the child component has a ref, compose them
            // if there is no ref from forwardRef, use the child component's ref
            ref: ref ? composeRefs(ref, (newElement as any).ref) : (newElement as any).ref,
          },
          newChildren
        )
      : null;
  }

  if (React.isValidElement(children)) {
    return React.cloneElement(children, {
      ...props,
      ...children.props,
      // set the ref here as well
      ref: ref ? composeRefs(ref, (newElement as any).ref) : (newElement as any).ref,
    });
  }

  console.warn("Slot component should have only one React element as a child");

  return null;
});
Once that code is in place, modify the Button component as well so it can receive a ref.
/**
 * Button.tsx
 */

import React from "react";
import { AsChildProps, Slot } from "./Slot";
import { Slottable } from "./Slottable";

interface Props {
  children: React.ReactNode;
  icon?: React.ReactNode;
  onClick?: () => void;
}

export type ButtonProps = AsChildProps<Props>;

                      /* the ref type is set to any for now */
export const Button = React.forwardRef<any, ButtonProps>((props, ref) => {
  const { asChild, children, icon } = props;
  const Element = asChild ? Slot : "button";
  return (
    <Element
      ref={ref}
      style={{
        padding: "10px",
        border: "1px solid #000",
        borderRadius: "5px",
        backgroundColor: "transparent",
        fontSize: 12,
      }}
    >
      {icon}
      <Slottable>{children}</Slottable>
    </Element>
  );
});
Now let’s check that it works.
/**
 * App.tsx
 */

import { useEffect, useRef } from "react";
import { Button } from "./components/Button";

const Icon = () => <span>🔴</span>;

const App = () => {
  const buttonRef = useRef<HTMLButtonElement>(null);
  const parentRef = useRef<HTMLAnchorElement>(null);
  const childRef = useRef<HTMLAnchorElement>(null);

  useEffect(() => {
    console.log(buttonRef.current, parentRef.current, childRef.current);
    console.log(buttonRef.current === parentRef.current, parentRef.current === childRef.current);
  }, []);

  return (
    <div>
      <Button icon={<Icon />} ref={buttonRef}>
        This is button
      </Button>

      <Button icon={<Icon />} asChild ref={parentRef}>
        <a href="https://kciter.so" ref={childRef}>
          This is link
        </a>
      </Button>
    </div>
  );
};

export default App;
The log shows that it works as expected.

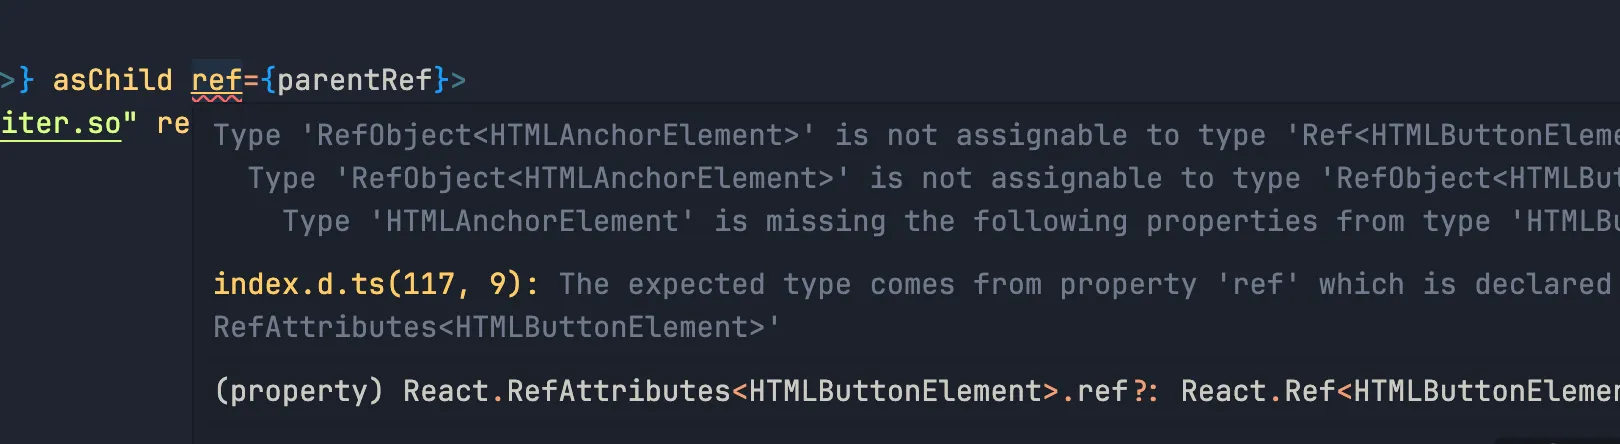
If you give the Button component an explicit ref type, you can no longer use HTMLAnchorElement, the child component’s ref type, on the parent component.
/**
 * Button.tsx
 */

type ButtonElement = React.ElementRef<'button'>;
export const Button = React.forwardRef<ButtonElement, ButtonProps>((props, ref) => {
  // ...
});
The prop Merging Problem
Another special situation is when the parent component and the child component have a prop with the same name.
<Button type="primary" asChild>
  <Anchor type="underline" href="https://kciter.so">
    Click me!
  </Anchor>
</Button>
With the code written so far, the child component always overwrites the parent component’s prop. For example, suppose you wrote the following.
<Button icon={<Icon />} onClick={() => alert("Hi!")} asChild>
  <a onClick={() => alert("Hello!")} ref={childRef}>
    Show alert
  </a>
</Button>
If you want both onClicks injected here to run, the code implemented so far can’t do it. Some props may need special rules like this. For such cases, let’s add a function to the Slot component that merges props. The following code is also used in Radix. I added a few comments to help explain it. Let’s take a look.
type AnyProps = Record<string, any>;

function mergeProps(slotProps: AnyProps, childProps: AnyProps) {
  // start with the child props
  const overrideProps = { ...childProps };

  // walk through the child props
  for (const propName in childProps) {
    const slotPropValue = slotProps[propName];
    const childPropValue = childProps[propName];

    const isHandler = /^on[A-Z]/.test(propName);

    // if it's an event handler starting with "on"
    if (isHandler) {
      // if both exist, combine them so both handlers run
      if (slotPropValue && childPropValue) {
        overrideProps[propName] = (...args: unknown[]) => {
          childPropValue(...args);
          slotPropValue(...args);
        };
      }
      // if only the Slot has one, use that
      else if (slotPropValue) {
        overrideProps[propName] = slotPropValue;
      }
    }
    // for the style prop, merge the Slot's and the child's style
    else if (propName === 'style') {
      overrideProps[propName] = { ...slotPropValue, ...childPropValue };
    }
    // merge the className prop the same way
    else if (propName === 'className') {
      overrideProps[propName] = [slotPropValue, childPropValue].filter(Boolean).join(' ');
    }
  }

  // merge slotProps with the overrideProps built above
  // since the spread operator is used, overrideProps wins on the same name
  return { ...slotProps, ...overrideProps };
}
Let’s modify the Slot component with this function.
/**
 * Slot.tsx
 */

export const Slot = React.forwardRef<any, SlotProps>((props, ref) => {
  // ...

  if (slottable) {
    // ...
    return React.isValidElement(newElement)
      ? React.cloneElement(
          newElement,
          {
            // merge the Slot's props with the child component's props
            ...mergeProps(slotProps, newElement.props) as any,
            ref: ref ? composeRefs(ref, (newElement as any).ref) : (newElement as any).ref,
          },
          newChildren
        )
      : null;
  }

  if (React.isValidElement(children)) {
    return React.cloneElement(children, {
      // add it here too
      ...mergeProps(slotProps, children.props) as any,
      ref: ref ? composeRefs(ref, (children as any).ref) : (children as any).ref,
    });
  }

  // ...

  return null;
});
Then test it with the following code.
/**
 * App.tsx
 */

import { Button } from "./components/Button";

const App = () => {
  // ...

  return (
    <div>
      {/* ... */}
      <Button icon={<Icon />} onClick={() => alert("Hi!")} asChild>
        <a onClick={() => alert("Hello!")} ref={childRef}>
          Show alert
        </a>
      </Button>
    </div>
  );
};

export default App;
After writing this code, clicking the button shows two alerts. These merging rules, however, can’t be known without reading the code. So in a case like this, you need to make sure the rules of the merge function you built are communicated clearly.
Polymorphic vs Render Delegation
You may wonder which to use, the Polymorphic component covered earlier or Render Delegation. Both aim to solve similar problems, but they’re used differently and each has its own trade-offs.
In terms of readability, Render Delegation clearly separates the two components, so you know exactly which prop is used where. Polymorphic merges the components into one, so it can be hard to tell which component a prop belongs to. But when the component structure isn’t complex and a complete replacement is possible, Polymorphic is simpler to use. For example, if there is a Header component and as is used to change it to h1 or h2, Polymorphic can be more intuitive.
So in my view, Polymorphic suits cases where you change what wraps the whole component. For example, changing the DOM used by a button component from button to a or to input[type=submit]. Render Delegation, on the other hand, suits delegating part of a component.
There are a few other topics to discuss, such as type inference performance, code complexity, and rendering speed. The Polymorphic component has complex type composition, so type inference is slow. Render Delegation is simpler by comparison, so type inference is fast. This also affects autocompletion performance, which can affect productivity. If you’re interested in these issues, you might also look at the following links.
- https://github.com/ariakit/ariakit/issues/1245
- https://sandroroth.com/blog/react-polymorphic-components/
- https://www.bekk.christmas/post/2023/01/polymorphism-in-react
Closing
The Polymorphic component using as from the earlier post and the Slottable component using asChild each have strengths and weaknesses. So rather than following one of them as the better option, you should know that various patterns exist and choose the appropriate one for the situation. The final code from this post is in the GitHub repository.
-
It’s called Render Delegation because the rendering is handed over to another component. ↩